Showing posts with label crafting. Show all posts

Friday, August 30, 2013

Momma's Never Forget.... A Crafty Repurpose Dry Erase Project

Reclaimed Cupboard Door Dry Erase Boards

In a busy world, you sometimes need reminders to help keep you focused and on track.  Even the savviest of momma's need a reminder to not forget everything that is on their plate! Technology is a great tool for some. But for many, the tactile and visual experience of a written note is a better option to help them keep organized. Here’s an easy and inexpensive way to create a beautiful dry-erase board for those notes, using repurposed items.


You Will Need:

  • Reclaimed Cupboard Door* 
  • Acrylic Paint
  • Clear Contact Paper/Shelf Liner 
  • Masking Tape 
  • Sand paper 
  • Gentle Soap and a wash cloth 
  • Dry erase pens and eraser ** 

Directions:  (Check out the video link below for a demonstration)

1. Begin prepping the reclaimed cupboard door by wiping it down with a gentle soap and water solution and a wash cloth to remove any household residue. Once it is thoroughly dry, gently sand the center panel of the door with a fine sand paper. Wipe of any residue from the sanding.

2. Use masking tape (or any painter’s tape) to tape-off the area that will be painted.

3. Paint the taped off area with two coats, letting the first coat dry completely before painting the second. Let second coat dry completely before moving to the next step.

4. Measure the painted area and cut a piece of clear contact paper/shelf liner to the same dimension.

5. Pull back one edge of the contact paper far enough to match it up with the edge of painted surface. Apply the exposed (sticky) side to the edge of the painted surface. Slowly peel away paper backing while smoothing the surface side against the painted surface. When it is completely applied use your hands to smooth out any air bubbles. Note: If using dark colored paint, the surface will have a chalk board look to it.

Use the existing drill holes from the hardware as a guide for affixing wall hanging hooks to your finished board. Hang it up and write away! 

Check out this link for an on air segment demonstrating this fun craft!


*If a cupboard door is not available, any board with a flat surface can be used.

**If using dark paint, use bright or neon pens. If using a lighter paint, note that you may need to change out the contact paper on occasion to keep the board looking fresh. Terrycloth square can be used in place of an eraser if needed.


Thursday, June 27, 2013

Easy Coffee Can Dye Shirt

Easy Coffee Can Dye Shirt

Here is a fun and easy patriotic crafting project just in time for the 4th of July! With a few supplies and a few bits of time, you can create unique and fun designs to put some sparkle into your summer.

Here’s what you’ll need:

White cotton or cotton-blend tank
Red and Blue liquid dye
A coffee can
Rubber band
White acrylic paint
Fabric medium
Crystal or crystal look embellishments.


Here’s how you do it:

1.Wet the shirt and wring it out. Lay it flat and begin folding the shirt into a long rectangle, keeping in mind that the parts of the shirt that will take the most color on are the parts closest to the dye. Roll the rectangle into a log that narrow enough to fit into the coffee can with about an inch of room all the way around. Secure with a rubber band in the center of the log.

2.Mix the lighter (red) dye according to the package directions and fill the can about half way- keeping in mind the height of your rolled shirt. (The dye should reach up to about half of the height of the log when it is in the dye.)

3.Stand the log on end in the coffee can. The dye should reach about halfway up the shirt. Let it sit for about an hour. Go grab a cup of coffee, run an errand, catch up on your great summer read.


4.Carefully remove the shirt from the dye. Leaving the shirt rolled, run the log under hot water, letting the water run from the top of the un-dyed end through the bottom of the dyed end. Continue until the water runs pretty clear. Squeeze any excess water out and repeat steps 2-4 with the  darker (blue) dye.

5.Unrole the shirt and rinse in hot soapy water until water runs clear. Let it dry.  


6. Mix 2 parts white acrylic pain with 1 part fabric medium.


7. Lie shirt flat with a barrier layer between the front and back of the shirt. Stencil on stars in desired pattern.


8. Embellish tips of stars with crystals if desired. Enjoy!!


Tips: 
 
ALWAYS handwash this project separately. It may bleed to other fabrics if washed together.

The tighter the shirt is rolled, the lighter the interior of the roll will be. Looser it is rolled, the more colorful the interior. 

You may want to wear plastic gloves while doing this project. Dye may stain your hands.


Thursday, May 31, 2012

Does Organization Drive You Up A Wall? Put it ON the Wall!

I LOVE to get my crafty on, but my organization skills when it comes to my supplies is a bit.... well.... lacking. The prospect of getting all of my stuff organized is so overwhelming. Scissors, tape, glue guns, pens, sewing needles, paint, glitter, scrap paper, you name in, it is in my supplies.  Every time I feel the creative part of me nipping my heels, I dig through boxes and boxes to find what I need.  It takes up so much horizontal space and working surface area. I know I need to get a handle on it, but it drives me up a wall!

Regardless, it has to be done.

In Mom of Many Hats fashion, I tackled the job of organizing head on, finding a solution to my organization issues and strife, as well as the frustration of the crafting supplies taking up my surface space.  I decided to not let it drive me up the wall... I decided to put it ON THE WALL!

Using a prefab shelf piece (only cost about $3.50)  some coffee/coffee drink cans I had been saving for just the right project, a couple of mug hooks and some magnetic strip, hot glue and screws, I put my creative hat on and got to work!

First, I took the coffee/coffee drink cans and placed them on the shelf board in a pattern that is both appealing and functional.  I placed the plastic lid on the bottom of the cans for an extra bit of stability and a bit of non slip security.  When I had them in the pattern I liked, I took a dab of hot glue to temporarily affix them to the shelf board.

Next, I used a small 1/2" screw to permanently attach the cans to the board.  It took a bit of elbow grease with a manual screwdriver, but it was made much easier by using the end of the screw driver to punch a small lead hole in the bottom of the cans.

Once all of the cans were affixed, I added a few cup hooks and magnets for hanging supplies that wouldn't fit in the cans, or that were metal and could easily bond to the magnets.  I added a sturdy hanger on the back to hang it on the wall. I filled them with my commonly used crafting supplies.

When all of the hooks, magnets, and cans were affixed, I had a ready to use craft supply center that not only keeps my supplies out of the way on my work surfaces, it keeps them at my fingertips, on the wall.  It was an inexpensive way to solve my organizing angst and a way to recycle, reduce, and reuse the coffee cans that could clutter a landfill or continue cluttering the shelf in my pantry.

A bit of innovation, determination, and recyclization (ok I made that last one up), and you too, can have a handy caddy to hang on your wall for your crafting, or other supplies!

If you found this project useful or if you have tried it out, please post a comment below.  Feel free to Pin, Tweet, FB, Link, Digg... or any other form of sharing.  I love to hear your feedback!

Monday, February 13, 2012

6 Easy Kid and Parent Friendly Projects for Valentines Day!

Are you crafty??

Here are six easy projects you can do with candy hearts to spruce up your Valentine table! 

We don't typically do a lot of decorating for Valentines Day, but it sure is fun to put a bit of the Valentine spirit into the days festivities.  why not have a fun afternoon with the kids and share a few minutes after school today to bring a touch of love to your home or table? These 6 crafts are the perfect way to do that! All of them can be done by you or by your kids, and all can be done in 30 minutes or less. These are fantastic ways for you to have fun, to be creative, and to foster the same in your children.  Enjoy these simple crafts that take no more than a bag of candy hearts and some things you probably have around the house! Enjoy!


The Romantic Candle! 
Time: 5 minutes
Find a few of your favorite sayings on the large candy hearts.  Heat up your hot glue gun - low temp glue guns work just fine.  Glue the hearts to the lower portion of a candle, spaced evenly. (I used a red candle left over from the Christmas holidays) Place in a pretty candle holder and Viola' ! A romantic candle to brighten your table! 

Note: ALWAYS use caution when burning candles - extinguish the flame before you leave the room and before it gets down to the level of the candy hearts. 


I Give You My Heart Plaque
Time 30 minutes

Separate candy hearts by color - a great way for your kids to work on color recognition and organization.  Use as many colors as you'd like.  Draw a heart on a piece of cardboard or other solid base. If you want and accent color on the base, apply that first - covering the entire base.  Use white glue to apply the hearts, one color at a time, to the inside of the heart.  Let it dry before standing upright. This is a colorful way to give your heart, or your child to express how much they love mom, dad, siblings, or other family!


Heart Jewelry
Time 20 minutes

For the little ones, a simple candy heart necklace can be made from ribbon and hearts.  Choose one large heart and approximately 14 small hearts in the sayings and colors of your choice.  Cut a piece of ribbon approximately 18 inches long.  Starting in the center, glue the large heart with low temp hot glue. Working out from the center, glue the smaller hearts in the pattern you desire.  

For the more experienced jewelry maker, use beads and jewelry findings to create a pendant style necklace.  Adhere findings to the heart using hot glue and string on a simple string rope.  

Keep My Heart
Time 30 Minutes

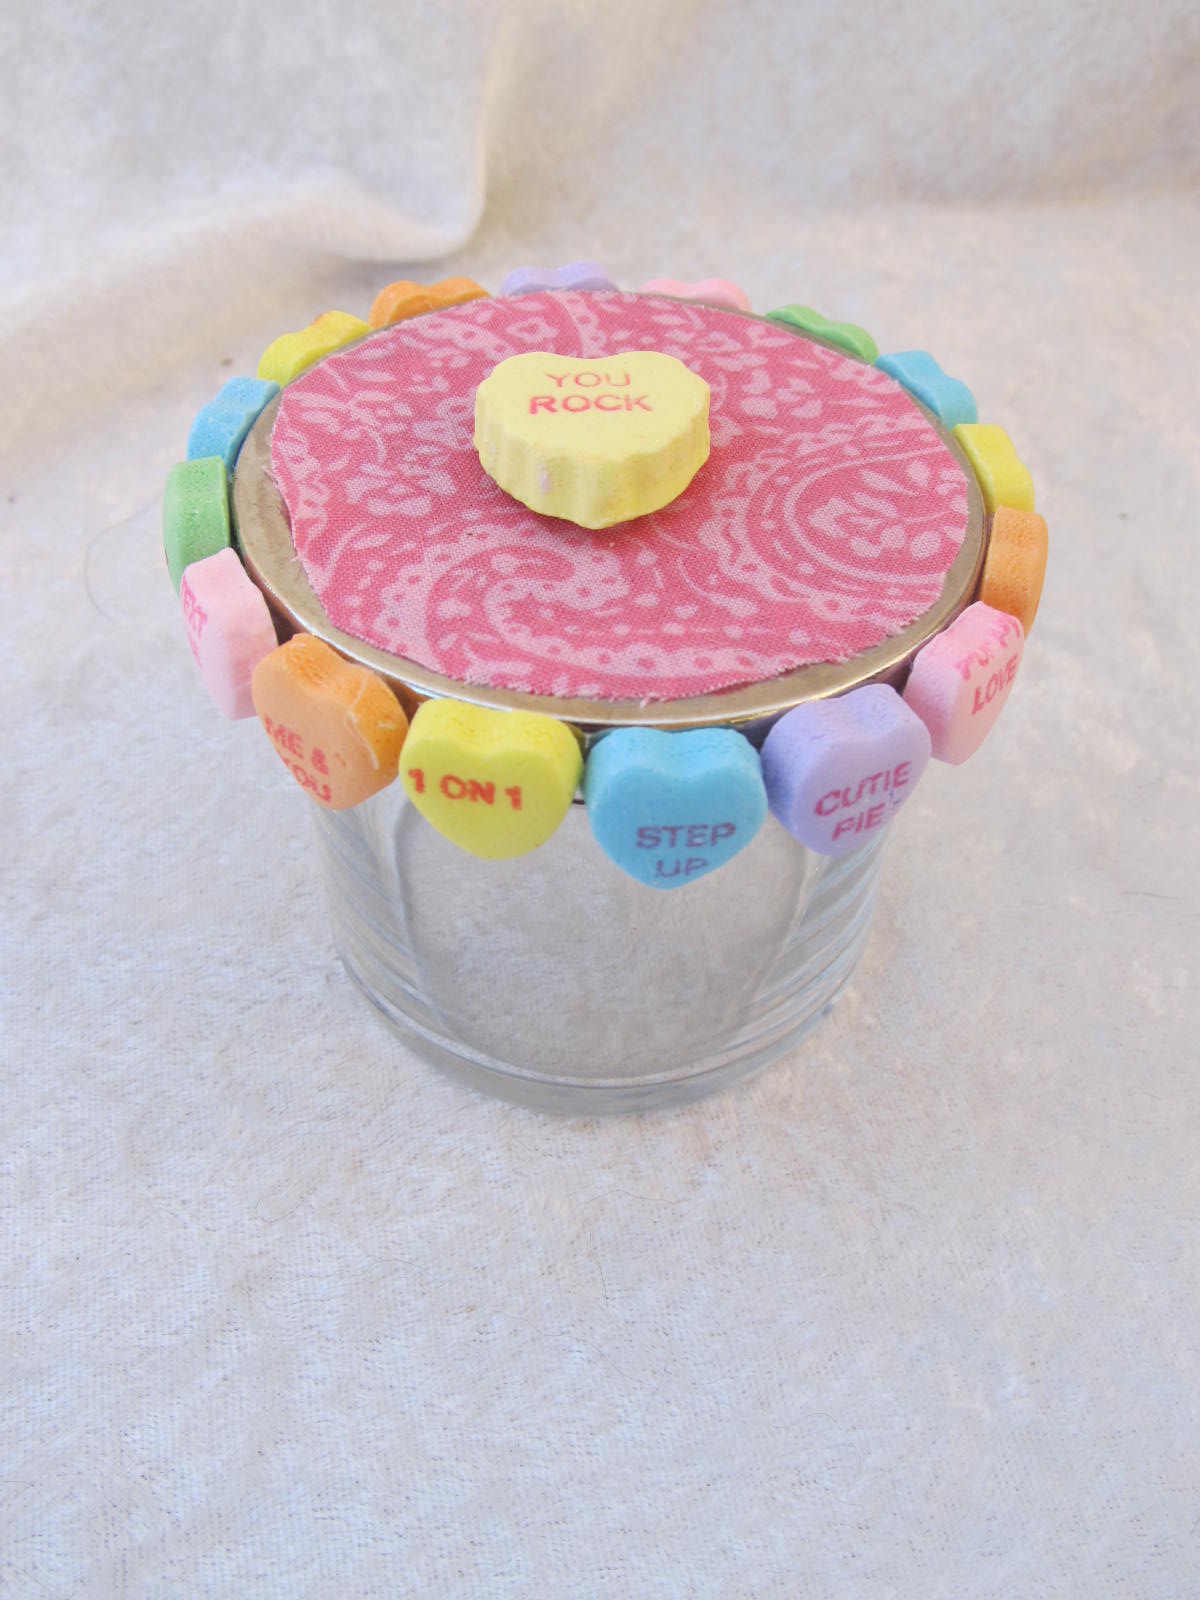
Using a re-purposed candle jar from the holidays, or any other container you have, create a "Keep My Heart". Glue a piece of fabric to the top of the lid and let it dry. Using low temp hot glue,  glue a large heart to the center top of of the jar and let completely dry.  Using small hearts, choose your favorite colors and sayings to line the lip of the lid.  Adhere with low temp hot glue.  In minutes you can have an adorable keep sake for Valentines day!


Sweet Hearts and Flowers for Your Hair!
Time 10 Minutes

Find some of your last year's spring silk flowers and create a fun hair decoration.  Decorate the center of the flower using a single large candy heart in your favorite color.  Affix the heart with low temp hot glue and let dry.  Affix the newly decorated flower to a hair pin or clip and you have hearts and flowers for your hair! 


A Vase for Your Valentine Flowers!
Time 20 minutes

Using two containers create this candy heart vase.  Insert a small container into a larger one - making sure that there is about 1 inch between the perimeter of the smaller container and the larger one.  Fill the space between the two containers with candy hearts.  Fill the inner container with your favorite flowers or greenery! Simply stunning! 


Love is in our actions. Take the time today to have fun and be creative with your kids.  These are simple projects that you can do together to make your Valentine's Day a bit more fun! If your kids are too little or are grown, have fun with these projects yourself. We show love by what we say, but also in the effort we make to show those special people in our lives that we love them.   ENJOY! 

Do you have any other suggestions? I'd love your comments and feedback on these easy crafts!