Decorated Totes
Did you resolve to step into the New Year with a better you?
One way you can do that is by adopting the habit of using
reusable shopping totes to reduce plastic and paper bag waste. You could purchase reusable bags with store
logos on them, or, you can customize
your own and tote your purchases with your own personal flare. With just a few
supplies and a bit of creativity, you can easily create fun and fashionable
bags that fit your personality and lifestyle.

Supplies Needed:
Plain shopping totes (canvas, cotton, or other fabric)
*Stencils
Stiff paint brush or sponge brush
Acrylic crafting paint
Fabric Medium
*Stencils can be pre-cut or can be made easily made by
tracing desired shape on the paper side of contact paper and cutting out the
shape with crafting scissors. The contact paper can then be removed from the
paper backing and placed on object to be stenciled.
To Make:
Lay the bag flat, smoothing out any wrinkles. Place a barrier inside of the bag to catch
any paint bleed through the material.
Choose the stencil and place it in the desired position on the bag.
Secure the stencil with tape if needed. Mix 4 parts paint to 1 part fabric
medium. Apply the paint to the stencil,
being careful to not lift the edges of the stencil. The best results are
achieved when using a tamping motion with the brush. Leave the stencil in place while the design
dries slightly. Apply a second coat of
paint if needed or desired. Carefully
remove the stencil before the design is completely dry.
Variations:
Chunky stamps can be used in place of the stencils. Use the 4:1 paint to medium ratio mix to
cover the stamp and stamp the bags as desired. Note: Always do a test stamp on
a piece of paper to see how the stamp transfers the paint. If it is too heavy, consider using a paint
brush to cover the stamp with paint rather than dipping the stamp into the
paint.
Instead of paint for your creation, cut shapes and designs
out of fabric scraps. With an iron, fuse
the fabric to the bags using fusible webbing found in the fabric section of
crafting stores. Always follow the
instructions provided with the webbing for specific directions for use. This
method works best on natural fabric bags.
Synthetic materials may melt with the heat of the iron.

Here is a fun and easy patriotic crafting project just in time for the 4th of July! With a few supplies and a few bits of time, you can create unique and fun designs to put some sparkle into your summer.
Here’s what you’ll need:
White cotton or cotton-blend tank
Red and Blue liquid dye
A coffee can
Rubber band
White acrylic paint
Fabric medium
Crystal or crystal look embellishments.
Here’s how you do it:

1.Wet the shirt and wring it out. Lay it flat and begin folding the shirt into a long rectangle, keeping in mind that the parts of the shirt that will take the most color on are the parts closest to the dye. Roll the rectangle into a log that narrow enough to fit into the coffee can with about an inch of room all the way around. Secure with a rubber band in the center of the log.


5.Unrole the shirt and rinse in hot soapy water until water runs clear. Let it dry.

6. Mix 2 parts white acrylic pain with 1 part fabric medium.

7. Lie shirt flat with a barrier layer between the front and back of the shirt. Stencil on stars in desired pattern.

8. Embellish tips of stars with crystals if desired. Enjoy!!
Tips:
ALWAYS handwash this project separately. It may bleed to other fabrics if washed together.
The tighter the shirt is rolled, the lighter the interior of the roll will be. Looser it is rolled, the more colorful the interior.
You may want to wear plastic gloves while doing this project. Dye may stain your hands.
Crafting With Fabric (See Video Here: http://www.abc15.com/dpp/lifestyle/sonoran_living/crafty-idea-fun-with-fabric )
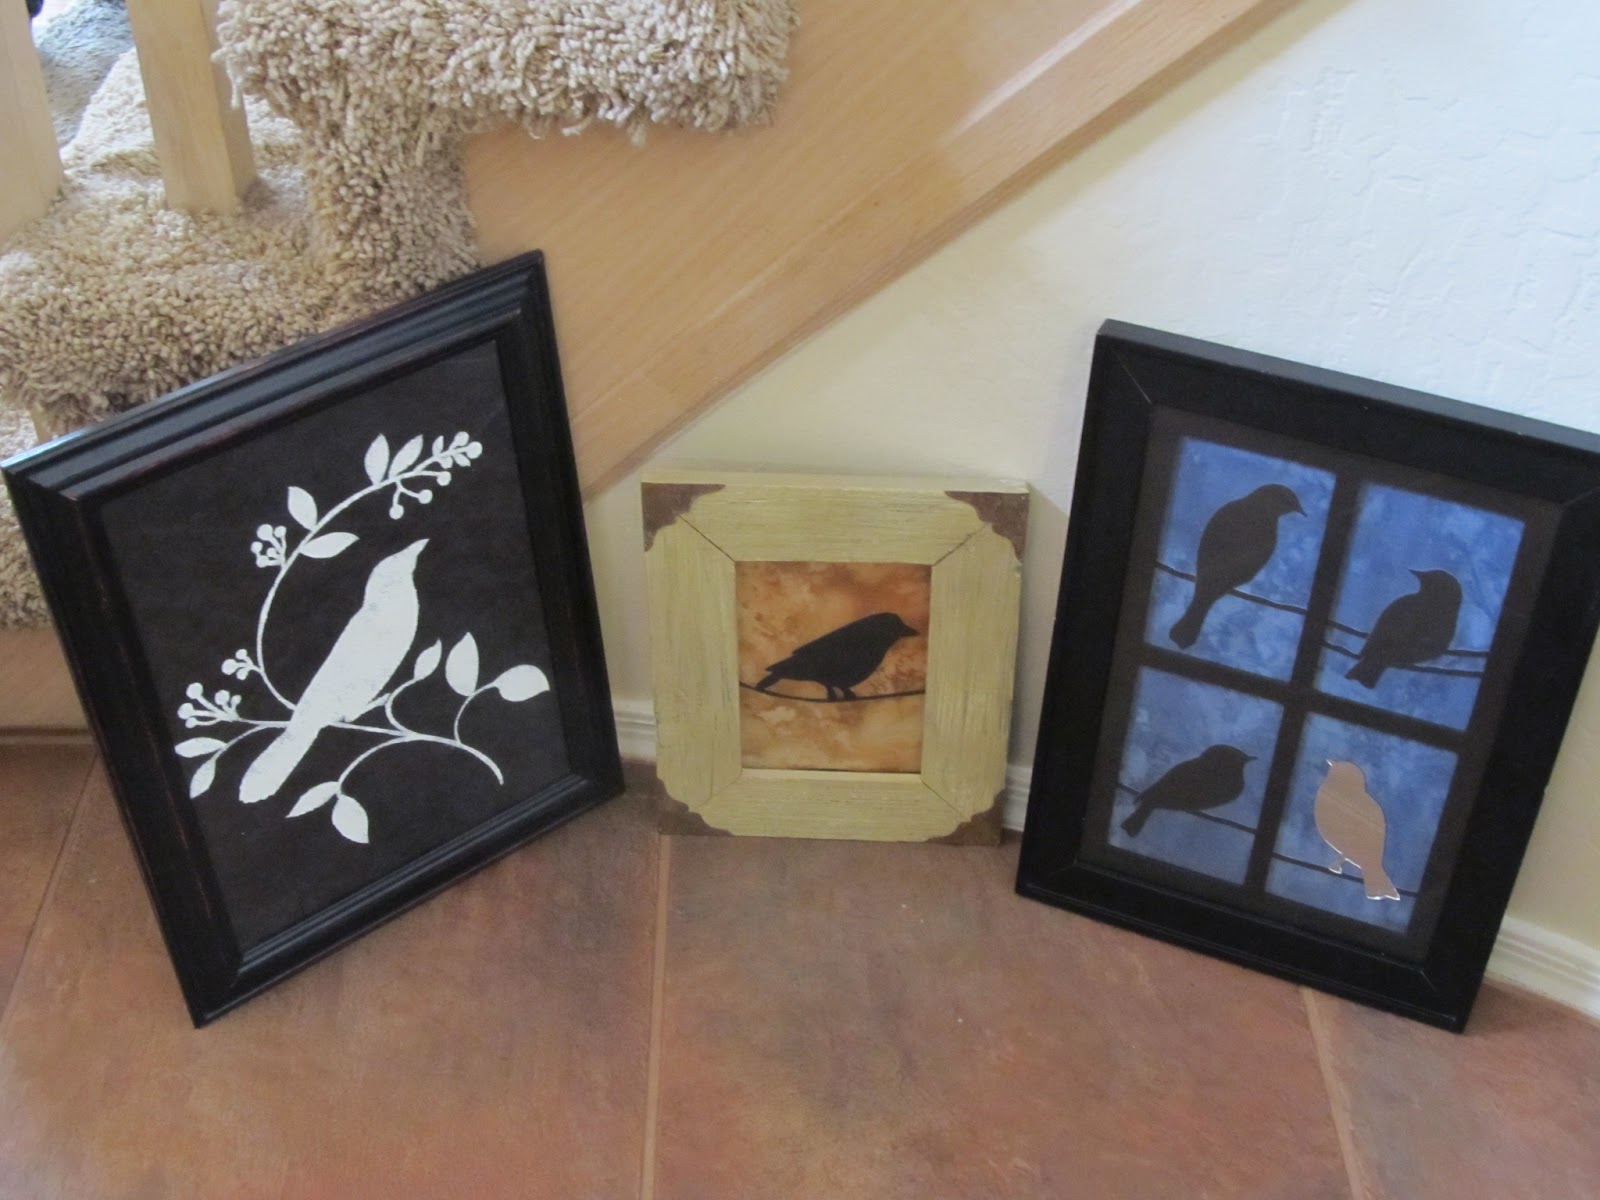
Crafting with fabric scraps and re-purposed picture frames is an excellent way to get your crafty on while staying out of the heat and adding cool décor to your home. Depending on your budget of both time and money, this craft can be tailored to what you are comfortable in spending in dollars and effort.
Crafting with fabric scraps and re-purposed picture frames is an excellent way to get your crafty on while staying out of the heat and adding cool décor to your home. Depending on your budget of both time and money, this craft can be tailored to what you are comfortable in spending in dollars and effort.
What You Will Need:
For
all of the variations you will need:
- Picture frame (free – about $4.99 at salvage stores)
- Fabric (free – varying depending on fabric selection and size needed)
- Scissors
- Double sided tape or glue
- Acrylic paint and paint brush if needed
Find a picture frame to your liking. Salvage stores, garage sales and even your
garage are great places to find wonderful frames that are perfect for this
project. Wooden frames can be lightly
sanded and painted with acrylic paint if you wish. Find a fabric that matches your décor or
project vision. If you are a crafter you
may already have scraps. If not, you can use an old piece of clothing, a cloth
napkin, a scarf, or you can by a small measure at a crafting store. (Stay away from tight woven polyester as
glues and paints don’t adhere as well). Cut the fabric to the size of the
inside of the frame (at least as big as the frame glass). Adhere the fabric to the frame backing using
double sided tape or adhesive. Flatten out the fabric so it is a smooth surface
to work on.
For the quick/more costly variation (blue background) you
will additionally need:
- Adhesive wall decorations found in the home décor section of crafting stores (From about $10 at crafting stores)
After you have prepared your smooth fabric covered surface
map out where you want your decorations to sit on the fabric. Adhere the decorations to the fabric. Place the back in the frame.
For the mid price/mid time variation (black background) you will
additionally need:
- Acrylic paint (2oz bottle $1.29)
- Fabric Medium (2oz bottle $2.00)
- Brush or sponge
- Stencil (From $1.99 at craft store or can be hand cut from cardstock)
Mix the acrylic paint in the color of your choice with the
fabric medium at a ratio of 3/1 (ie. ¾ oz paint and ¼ oz medium). Place the stencil on the fabric where desired
and secure with tape. Using a brush or
sponge, carefully tamp in color to the stencil to the desired opaqueness, being
careful not to lift the edges of the design.
Carefully lift the stencil. Let the design dry and insert into the
frame.
For the least cost/most time variation (gold background) you
will additionally need:
- A pencil
- Additional fabrics
- ideas
- Time
Using additional fabrics to embellish the flat surface, let
your mind and your ideas take over. Cut
shapes, color block, or draw freehand and cut out designs from the fabrics that
you love. Use double sided tape or small amounts of glue to adhere your
designs. Let your creativity flow and
enjoy the end result.

Materials:
50-60 Coffee filters
Wire (or wire coat hanger)
Ribbon

Bend a loop at one end.

Stack coffee filters two at a time.


When all are strung (there should be a few inches of wire left, connect the ends of the wire.
 Evenly space the set of filters, and then fluff by separating the filters.
 Add a ribbon and hang.

DIY Cake Plates!

Use your imagination and creativity to create these beautiful cake plates. A fantastic way to repurpose items into display pieces, gifts, and practical wares for your home!
1.
Choose your top piece and base – making sure they are stable
together. Check for food safe
information if it will be used for food. Keep in mind that the heavier the top,
the shorter the base, and that the top piece should be no wider than about
twice the width of the widest portion of the base.
2.
Clean both pieces making sure that both are free from oils, adhesives and
dirt.
3.
Measure the top piece diameter and the diameter of the portion of the
base that will be adhered to the top piece.
Find and mark the top piece at the points that center the base to the
top.
4.
Use a THIN line of clear adhesive sealant around the perimeter surface of
the base (found in the adhesives isle if home improvement stores) and affix the
base to the top piece. Leave it upside down till the adhesive dries – about 4-6
hours. For best results wait about 24
hours.
5.
Carefully turn over the cake stand. Supporting both top and bottom, check
to see that the adhesive is firm.
6.
Apply another bead of adhesive to the edge where the two pieces come
together and smooth. Let dry until
clear.
Keep in mind that you won’t want to submerge the pieces. For best results wipe clean.
DIY Summer Finds Shell Pendants!
 |
| Varnish, Modge Podge Dimensional Magic Shells, String/Ribbon Chain |
 |
| Bales, Crystals, Pearls, Hot Glue |
 |
| Finished Pendants! |
Get Organized!

Regardless, it has to be done.

Using a prefab shelf piece (only cost about $3.50) some coffee/coffee drink cans I had been saving for just the right project, a couple of mug hooks and some magnetic strip, hot glue and screws, I put my creative hat on and got to work!

Next, I used a small 1/2" screw to permanently attach the cans to the board. It took a bit of elbow grease with a manual screwdriver, but it was made much easier by using the end of the screw driver to punch a small lead hole in the bottom of the cans.

When all of the hooks, magnets, and cans were affixed, I had a ready to use craft supply center that not only keeps my supplies out of the way on my work surfaces, it keeps them at my fingertips, on the wall. It was an inexpensive way to solve my organizing angst and a way to recycle, reduce, and reuse the coffee cans that could clutter a landfill or continue cluttering the shelf in my pantry.

If you found this project useful or if you have tried it out, please post a comment below. Feel free to Pin, Tweet, FB, Link, Digg... or any other form of sharing. I love to hear your feedback!
Adorably Practical Caps!

I made one... and you can too!
Here is how you can take a plain cap and make it an original masterpiece - in about an hour.
 Start with a plain cap. You can purchase a new one, or go to your trusty ball cap collection and re-purpose one that you already have. Which ever you choose what you end up with will be beautiful and unique!
 Cut pieces of fabric scraps into designs that you'd like to see on your hat. I wanted a floral theme on mine and happened to have a piece of fabric with flowers printed on them. Press the pieces with an iron to eliminate any wrinkles. Place the pieces on the hat in the positions that you want to adhere them in. If you can, try to put the cap on your head so you can see what it looks like on - sometimes it makes a difference in how the final placement looks.
  When you are happy with the placement, use fabric glue and tack down fabric in the center of the piece. Do this will all pieces. Once all pieces are tacked, use a brush or toothpick to apply more glue to the edges of the pieces. Note: My glue favorite is Gem Tack Flexible glue by Beacon - it's for adhering gems, but works wonderfully for this project.
Once they have dried, use a tooth pick to place dots of glue around the edges of the fabric and adhere rhinestones. Let it all dry - and in about an hour you have a fantastically fashionable cap!
Enjoy!

Stamp it UP! Create Fun and Fashionable Clothing!


A fun and easy stenciling technique that will help you wear your crafting hat with style and ease! Create original and fashionable gifts for the holidays and still be friendly to your budget!
Stamped T-Shirts
Embellished Flip Flop Project
Fashion Stenciling Project
Adorably Spooky Halloween Ghost Project
What size Swarovski crystal's do you use for your flip flops! They are adorable! Pam
ReplyDelete